In today’s time where people are producing quality content, the content you post must meet the expectations and should be of high quality, silly content errors are immediately visible and people often get trolled for the same. That’s why many people have started using the Content Approval Workflow plugin on their WordPress website, as it works as a gatekeeper between content curation and content posting.
If you haven’t yet installed it, now is the time. Today we will help you understand how to review content in WordPress using the Content Approval Workflow plugin. Meanwhile, if you want a detailed guide on how to install and activate it, we have covered that too.
Quick Summary:
- Install Content Approval Workflow for quality.
- Set up plugin to require content approval.
- Team submits content, approvers get notifications.
- Review and approve posts via your dashboard.
Table of Contents
How to install the Content Approval Workflow plugin?
The installation and activation of the plugin is simple and easy. It can be done in three steps mentioned below.
Step 1: Install and activate the plugin.
Navigate to your WordPress Dashboard and follow these steps:
- Click on “Plugins” in the left-hand menu.
- Select “Add New” and search for “Content Approval Workflow”.

- Install and activate the plugin.
Step 2: Configure Content Approval Workflow Settings.
After activating the plugin, configure the Content Approval Workflow Settings:
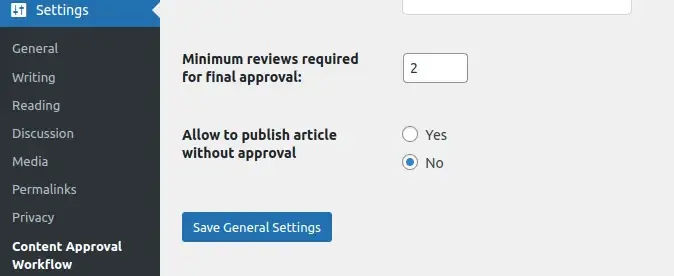
- Go to “Settings” and select “Content Approval Workflow”.
- In the “General” tab, set the minimum number of reviews required for final approval. E.g. 2 or 3
- Choose “No” in the “Allow to publish article without approval” option.

- Save the settings.
Step 3: Test the Approval Process.
Now the plugin is ready for use, let’s test the approval process:
- Create a new post and save it as a draft.
- Scroll down to find the “Content Approval Workflow” meta box.
- The meta box will display two messages.

- After a review, you may approve the post.
- On approval, the post can be published.
Further, let’s learn about how does the plugin work.
How does the Content Approval Workflow plugin work?
Once the plugin is installed and activated, your team members can send you a request to approve particular content based on the minimum request criteria set by you.
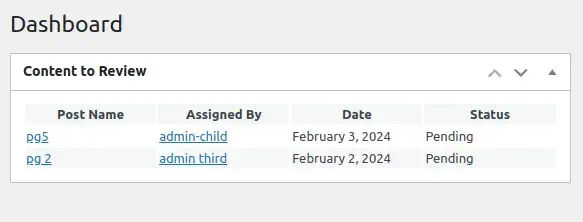
As they seek approval, a quick notification on the WordPress dashboard of the approver will appear.
Besides, a mail will be sent to the approver about the approval request received.
Now, let’s understand How to review content in WordPress upon receiving the content approval request.
How to review content in WordPress?
Navigate to your WordPress dashboard and follow these steps:
- On your WordPress dashboard, look for the meta box named “Content To Review.” This box displays posts that other users/teammates have requested for review.
- Click on the post you want to review from the “Content To Review” Meta Box.

- After opening the post, scroll down to locate the “Content Approval” meta box. In this meta box, you have the option to approve the content. On approval, a notification email will be sent to the requester (the person who requested the approval).

- You can also add feedback in the “Content Approval” Meta Box. This feedback is useful for communication and collaboration with the content writer. Learn how to add feedback
This plugin is being widely used by many content creators, entrepreneurs, social media managers, agencies, and companies to manage content seamlessly and post without errors.
If you haven’t installed the plugin, do it now! Besides, if you are looking for any professional help to manage your WordPress website, we are just a message away.


